Camera Operations and Functions
Camera=Room / Camera Obscura= Dark Room
The original concept of photography started in the 14th century with the invention of the camera obscura. Essentially, a camera obscura is a room with all light blocked out and a small opening in one side of the room to let in light. As light passed through the hole, it created an image inside the camera obscura of the scene outside the room- but upside down and backwards. The modern camera as we know it today still creates images this way.
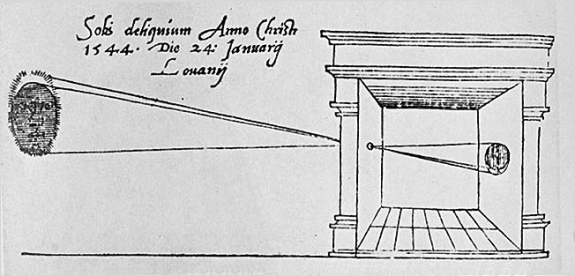
A 14th Century rendering of a camera obscura
|
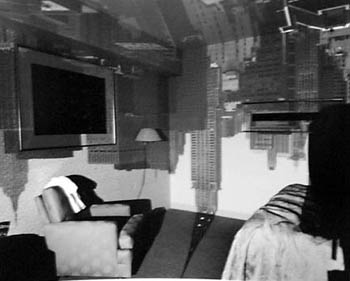
A camera obscura in New York City.
|
Basic Types of Cameras
- Twin Lens Reflex (TLR)- Two lenses- one for viewing and one for taking the photograph
- Single Lens Reflex (SLR/DSLR)- Movable mirror placed between the lens and the film to project the image seen through the lens to a focusing screen, uses 35mm film or the digital equivalent
- Medium Format- Film size between 35mm and 4x5
- Large Format/Field Camera- 4x5 negative plates or larger
How Digital Cameras Differ From Film Cameras
- Film is replaced by a light sensitive sensor that electronically records the image created by light that enters the camera onto a memory card.
- Film sets the ISO automatically; digital cameras allow you to choose
- The digital information is recorded as an array of pixels (picture elements) which are measured in megapixels (megapixel=1 million pixels).
- A large group of pixels give the illusion of continuous tone, the more pixels, the more detail the image will have. This is referred to as “resolution” and measured in PPI (pixels per inch).
- A 10 megapixel camera will have a high enough resolution to produce an 11x14 print.
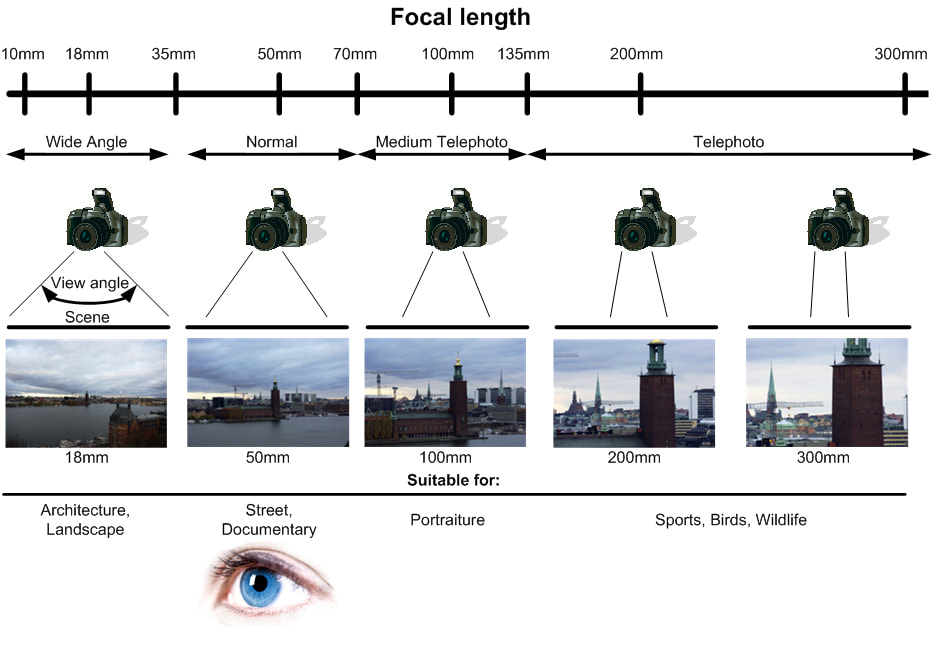
Different Types of Lenses
- Zoom- Variable focal lengths from wide angle to telephoto
- Telephoto- Long focal length, allows you to get closer to your subject when you cannot get physically closer
- Wide Angle- Short focal length, allows for more of a scene to be included in the photograph
- "Normal"- the same angle of view of our eyes; good for street photography
- Macro- Designed for close-up work/magnified detail of small objects
- Fish Eye- 180 degree view, extreme distortion around the edges
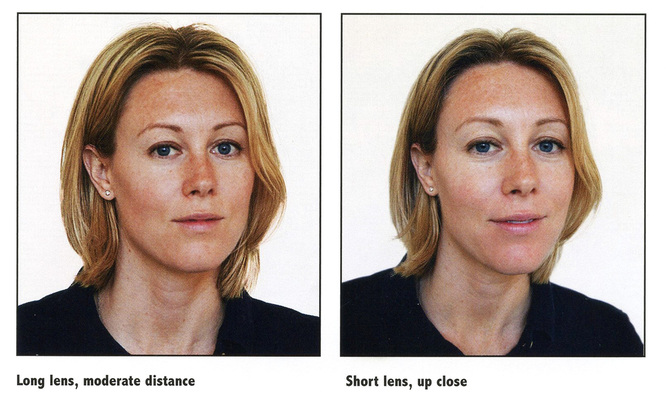
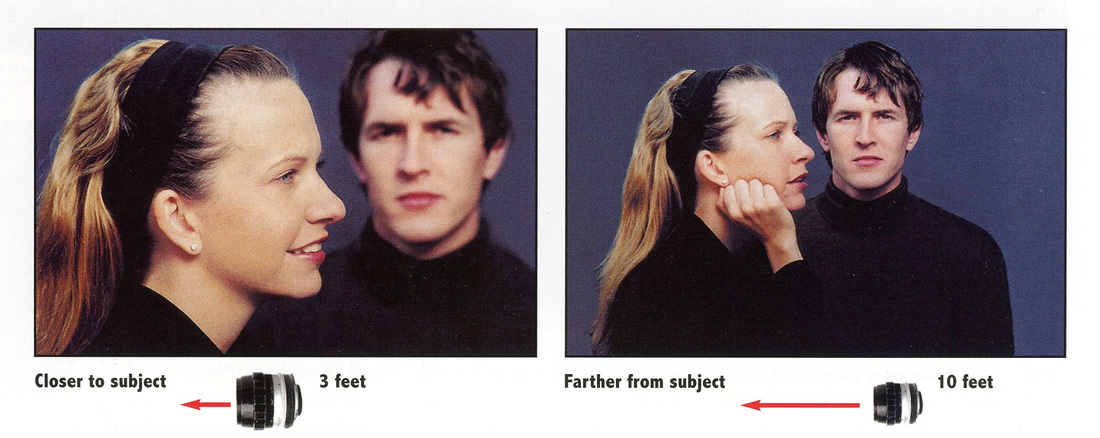
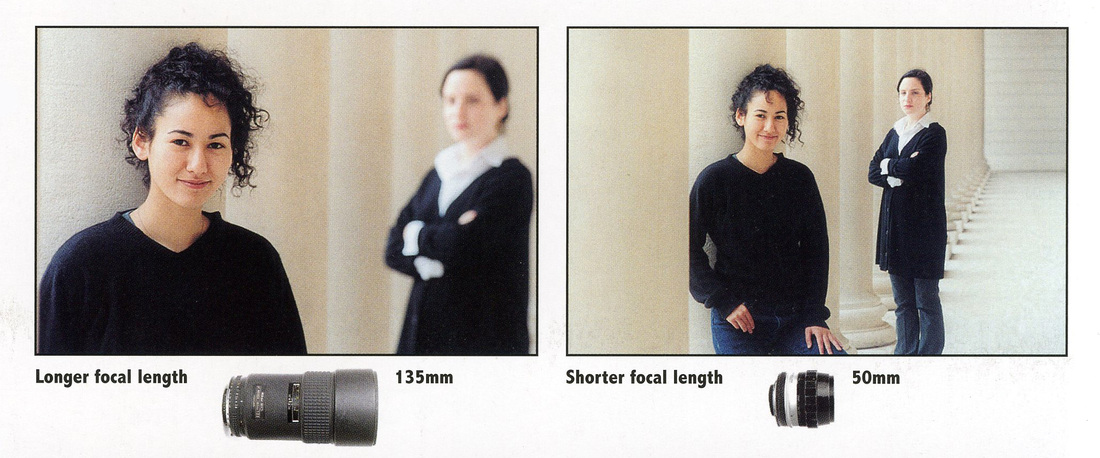
Long Versus Short Lenses
A short lens (like a wide angle), used in close range, will distort the subject by magnifying areas that are closer to the camera.
A long lens (telephoto) used at a moderate distance will produce an image that is more proportionally accurate.
A long lens (telephoto) used at a moderate distance will produce an image that is more proportionally accurate.
The Camera Lens: Aperture Control
- The lens contains a controllable iris or opening that lets light into the camera.
- This opening is made of metal blades that widen or narrow the opening according to how much light is needed to make an exposure.
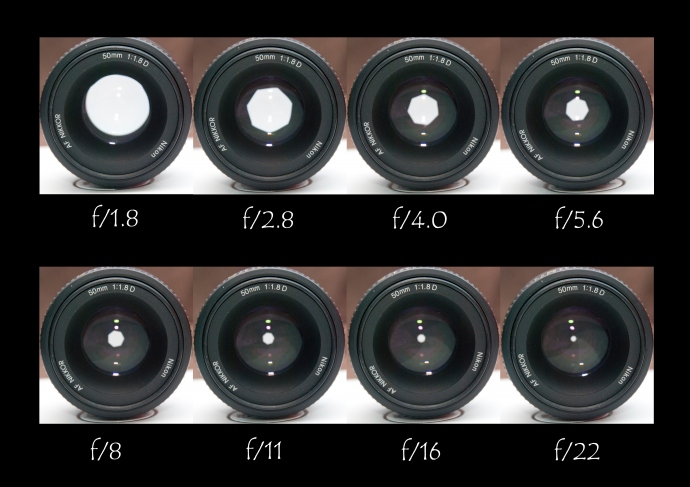
The Camera Lens: Using F Stops
• Apertures are measured in f stops.
• The smallest number in the series of f stops = most light.
• The largest number in the series of f stops = least light.
1.4 2.8 4 5.6 8 11 16 22 etc…
When you change your f stop to a smaller number (larger aperture), you are doubling the amount of light. This is called stopping up.
When you change your f stop to a larger number (smaller aperture), you are halving the amount of light. This is called stopping down.
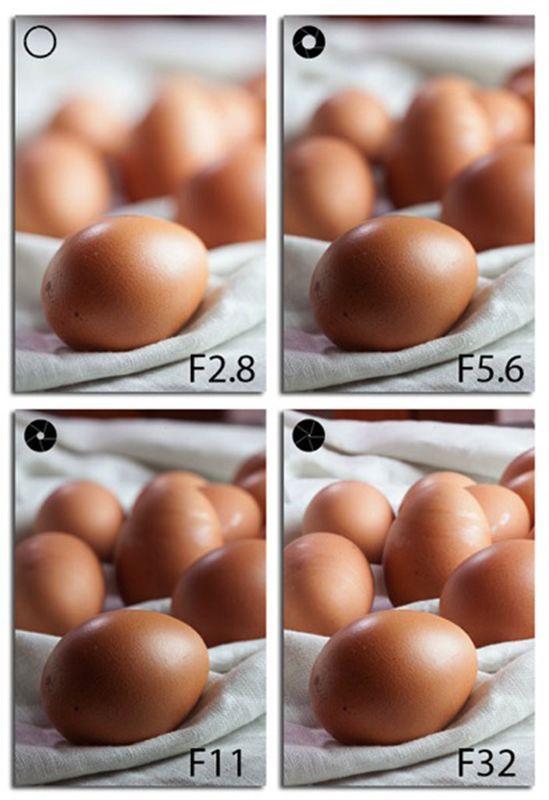
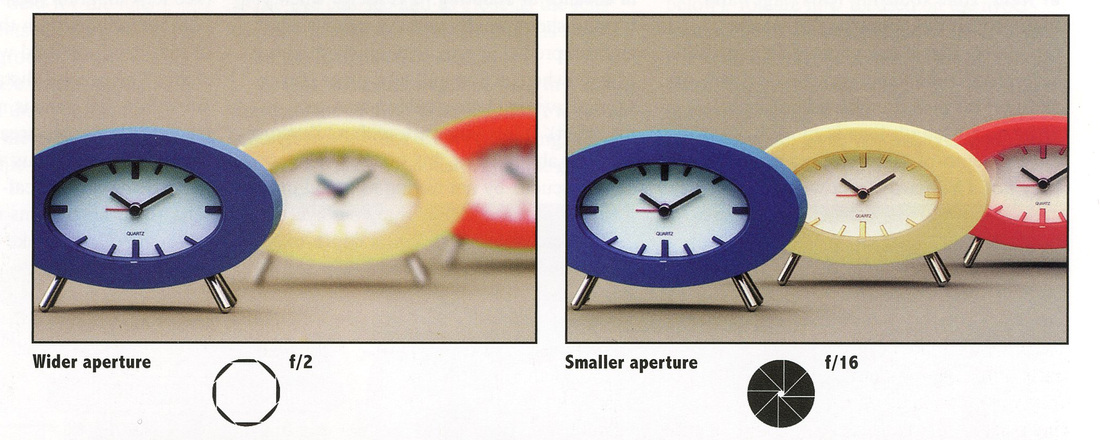
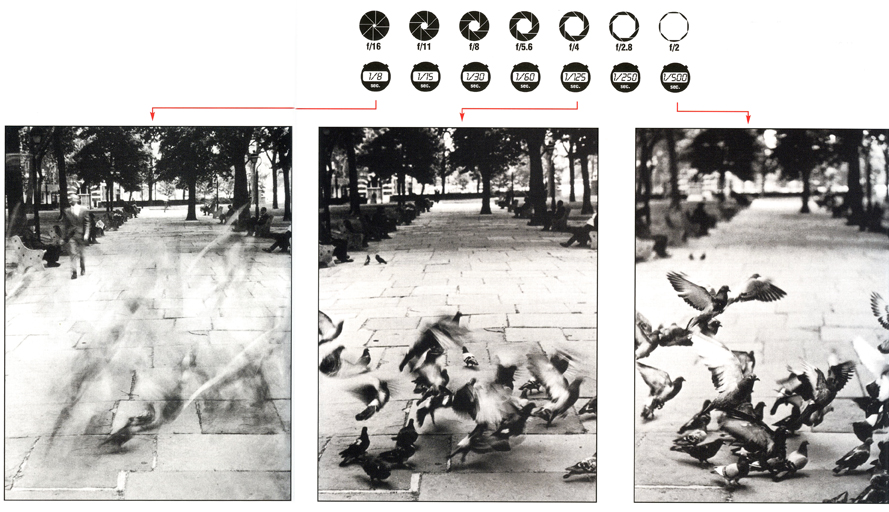
Aperture and Depth of Field (d.o.f)
- Stopping down (decreasing aperture size) increases the amount of image area in focus .
- This zone of focus is called depth of field.
- Smaller apertures give more depth of field.(F16 will give much more depth of field than F 4).
Using Depth of Field for Effect
- Maximizing depth of field allows you to focus on more of the image.
- Minimizing depth of field allows you to focus on a specific part of the image.
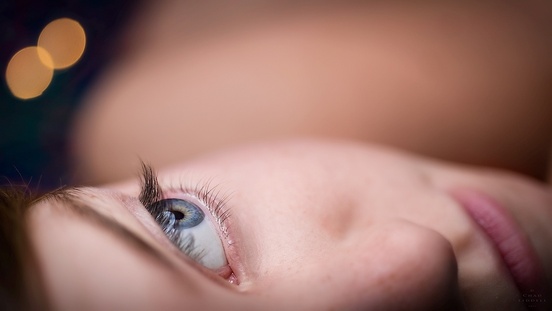
Shallow (minimized) depth of field
Maximized depth of field
Main Factors that Control Depth of Field
Smaller aperture sizes increase depth of field and larger aperture sizes will decrease depth of field. You can get much more d.o.f. when shooting outdoors in bright sunlight because you’ll be able to get a much smaller aperture than if you were to shoot in much lower light.
Distance from subject: The further away you are from the subject, the more depth of field.
Lens type: The wider the angle of view, the more depth of field.
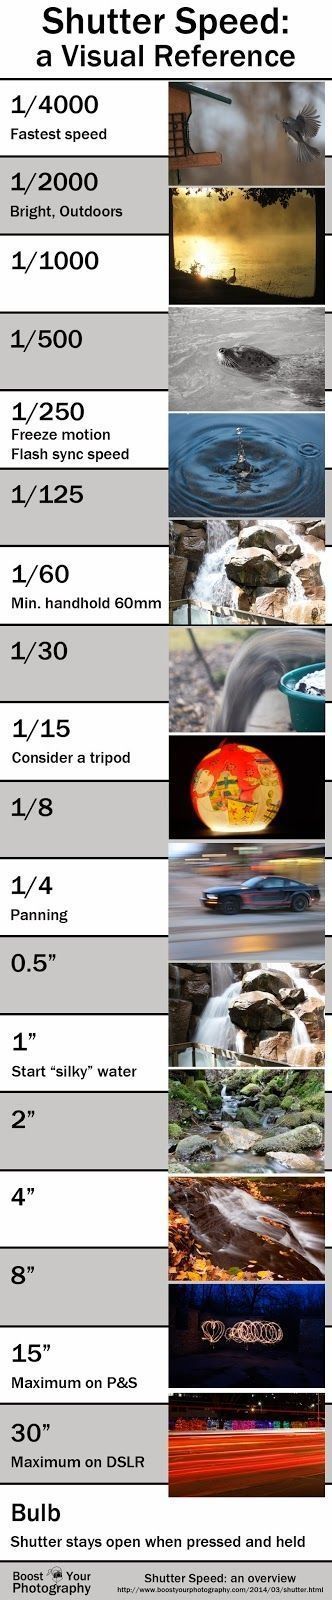
The Camera Shutter: The Basics
- The camera shutter lets light into the camera for a specified amount of time
- When shutter speeds are set manually, they usually use the following sequence of speeds, in seconds: 1, 2, 4, 8, 60, 125, 250, 500, 1000, 2000 etc…
- Setting the shutter speed at 1 keeps the shutter open for 1 second, however, each number after 1 is a fraction of a second.
- Setting the shutter to the “B” setting will keep the shutter open for as long as the shutter button is pressed.
The Camera Shutter: Motion Control
- When the shutter is open for a short period of time, an object in motion will appear “frozen”.
- When the shutter is open longer, anything that moves during the exposure will result in a blur. Use a shutter speed of 1/60 or shorter for photographing people.
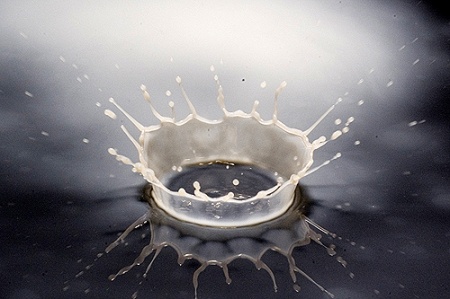
Fast shutter speed- shutter is open for a very short amount of time
|
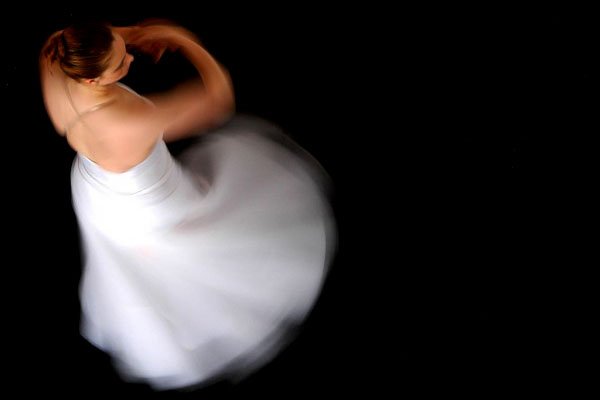
Long shutter speed- shutter is open for a longer amount of time
|
The Camera Shutter: A Problem
When the shutter stays open for an extended period of time (1/4 of a second or slower, usually) and you are not using a tripod, there is a significant chance that your image will come out blurry- this is called camera shake. To correct this, you can either decrease your shutter speed, use a tripod, change your ISO (see section on ISO), or a combination of these things.
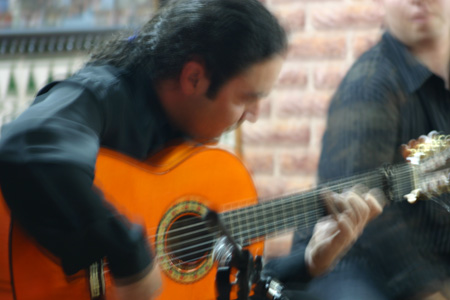
An example of camera shake
Examples of Shutter Speed Manipulation
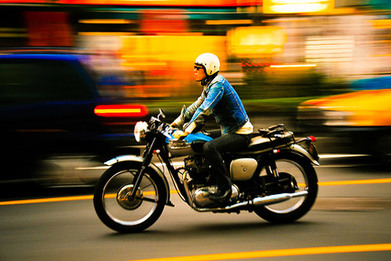
- Panning: Using a slow shutter speed and “following” the object in motion in the direction the object is moving with the camera
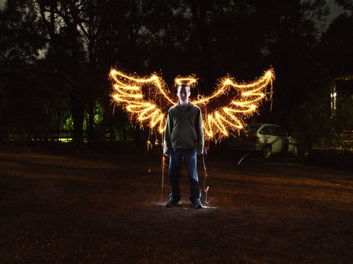
- Light Streaks/Painting With Light: Using a slow shutter speed (anywhere from 1 to 15 seconds using the “B” setting) with the camera on a tripod.
|
|
Equivalent Exposures
Using F Stops and Shutter Speeds together= RECIPROCITY
Note that given a small aperture, you must use a long shutter speed to allow enough light to enter the camera, but that when you use a larger aperture, you can decrease shutter speed.
The Camera Light Meter: How the Camera Reads Light
The camera’s light meter is a light-sensitive electronic component located inside the viewfinder and measures the amount of light entering the camera that is reflected from the subject.
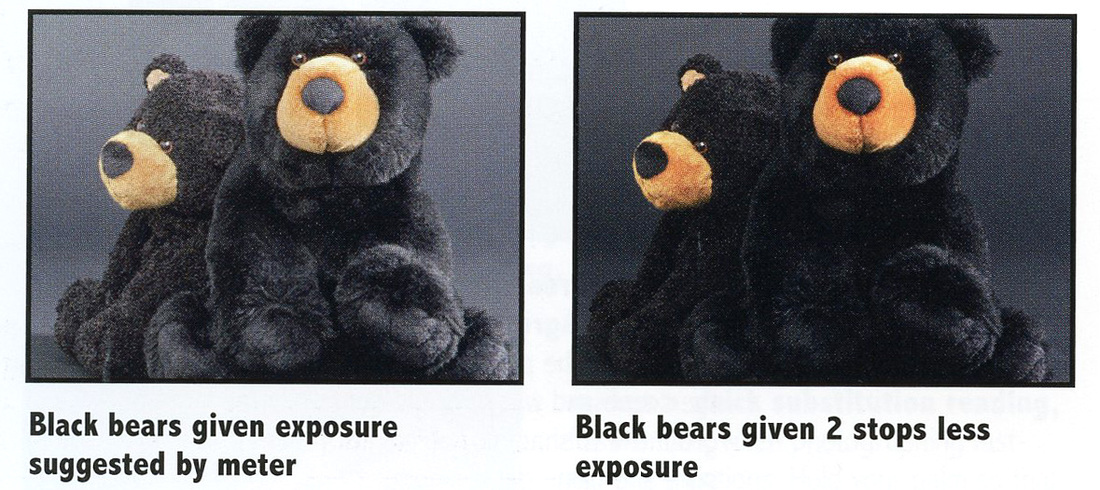
Your camera’s light meter is looking for the middle ground, a balance between the deepest shadow and brightest highlight and averages them into “middle gray”.
Your camera’s light meter is looking for the middle ground, a balance between the deepest shadow and brightest highlight and averages them into “middle gray”.
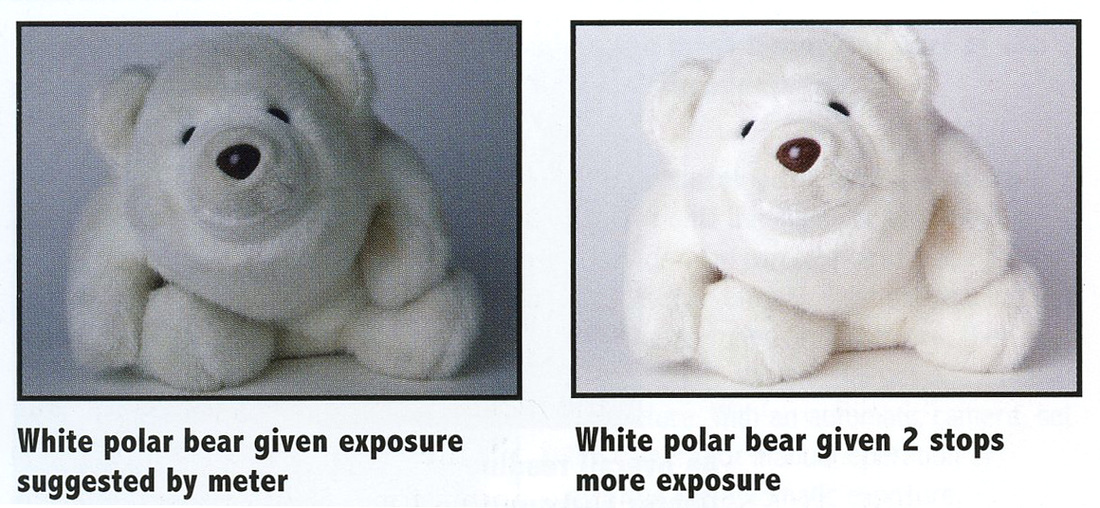
Overriding the Light Meter: When Photographing In Unusual Light Circumstances
If an image is either very dark or very light, or if there is a strong light source, your light meter will attempt to compensate and give you an incorrect reading.
- Dark image or bright subject against a dark background- SOLUTION: underexpose by 1 or 2 stops
- Light image/subject in shadow or with bright light behind them (backlit)- SOLUTION: overexpose by 1 or 2 stops
|
|
White Balance: The Color of the Light
Enables you modify the color of the light-
- Auto: White balance is automatically measured and adjusted
- Daylight: Preset for daylight (adds yellow)
- Incandescent: Preset for incandescent (tungsten) light (adds blue)
- Fluorescent: Preset for fluorescent light (takes away green)
- Cloudy: Preset for overcast sky (adds orange)
- Shade: Preset for use in the shade (adds warm tones, similar to cloudy setting)
Using the Light Meter and ISO
- The light meter also takes into account the sensitivity rating, referred to as either ASA or ISO.
- The higher the number, the shorter the shutter speed needed to produce a good exposure. For example: 400 ISO is faster (more sensitive to light) than 200 ISO.
- Use a higher number when shooting in lower light conditions.
- The higher the number, the more “noise”/ less detail is visible.
- If you need more fine detail in an image, use slower ISO (smaller #).

When to Use Different ISO Settings
100 or 200 ISO- Shooting in very strong light or shooting a non-moving subject with a tripod
400 ISO- Variable light conditions (normally leave your camera set on 400)
800 ISO- Shooting indoors or outdoors in limited light
1600 ISO or higher- Shooting a moving subject in very limited light
400 ISO- Variable light conditions (normally leave your camera set on 400)
800 ISO- Shooting indoors or outdoors in limited light
1600 ISO or higher- Shooting a moving subject in very limited light
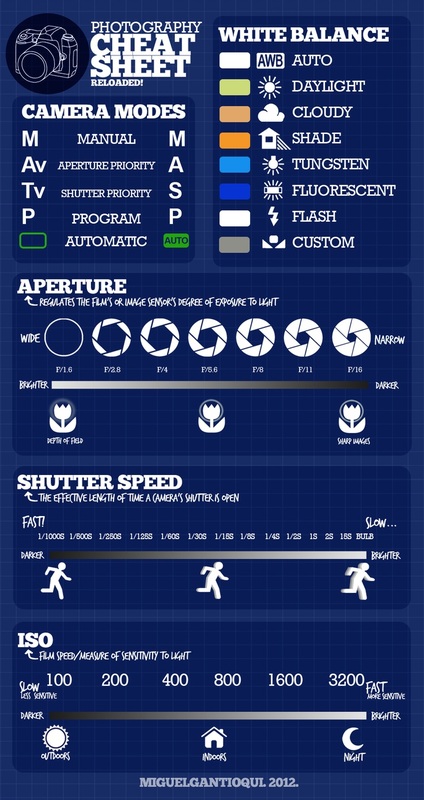
Here's Your Photography Cheat Sheet!